Disney On Ice Treasure Trove Follow Up

We had a great time at Disney On Ice presents Treasure Trove tonight! Disney ALWAYS puts on a great show. Here’s a little about some of our favorite moments.

We are all about Alice in Wonderland right now and my 4 year old was ecstatic when the Alice in Wonderland segment began.

2015_10_21_9999_44aThey enjoyed getting to see Tinkerbell and Peter Pan flying around, and of course defeating the mean Captain Hook!

2015_10_21_9999_82a

Of course, it isn’t a Disney production without an appearance by the Clubhouse gang – Mickey Mouse, Minnie Mouse, Donald Duck, and Goofy came out for a bit to introduce some segments.

2015_10_21_9999_23a

Disney On Ice presents Treasure Trove will be in Dayton, Ohio at the Nutter Center from until October 25, 2015, weekday tickets are just $13 – No code needed! Family 4-pack offer: $119 includes 4 tickets, 4 popcorns and 4 lemonades! (Use code FAMD26.)

Purchase your tickets here. Visit and follow Disney On Ice to always know when they are coming to your town on Facebook and Twitter and check out the hashtag #DisneyOnIce

In my last Disney On Ice post, I mentioned that our family costume would be Alice in Wonderland themed. I made these two costumes from a few items I found at Goodwill – the blue dress was a juniors dress, the apron was a pillow case, and the whole cat costume came from a women’s top. While they aren’t without their mistakes, I impressed myself with actually completing them (with plenty of time) and they actually look pretty darn good.

alice and cat costumes

I also made a slipcover for my Catbird Baby Pikkolo carrier! I used this tutorial but made the shape according the contours of my brand of carrier.

slipcover Collage

Video

Heroes of the City YouTube Review and Giveaway! #SummerLovin

Heroes of the City are an animated TV-series about rescue vehicles in a small town where everyone can be a hero! Follow the fantastically exciting adventures along with friends in town. Meet Paulie Police Car and Fiona Fire Engine as they help the townspeople find thieves, put out fires, and solve one of the many mysteries that happen in the otherwise quiet town. You will also get to know Calamity Crow, the most unlucky bird in town. Emphasizing friendship, Heroes of the City contains a great deal of warmth and what may be accomplished by helping each other. The cartoon is primarily targeted at children age 3 – 7.

They recently added a few more options on their YouTube Channel. In addition to new videos, giving you 6 hours of entertainment for 2-6 year olds, it is available in 18 different languages. Great for those of you with extended family or multilingual homes.

They have also added the Calamity Crow Kids Crafting Show. It provides tutorials for you and your children to watch and create together making wonderful, simple crafts with things found around the house.

Crafting_Show

On the Calamity Crow Sketch and Guess show, you’ll have to try to guess what’s being drawn before the picture is completed.

Finally, in On Patrol with Heroes of the City, kids will follow the heroes on patrol in the city and help them out along the way. On Patrol with Heroes of the City is fun memory training for the younger children. There is an easy, medium and hard version of each reconnaissance missions.

Be sure to stop by the Heroes of the City YouTube Channel then enter to win a prize pack below. Keep scrolling to learn more about the Summer Lovin’ Giveaway Hop!

heroes prize pic 2

a Rafflecopter giveaway

Giveaway ends 6/18/15 at 11:59pm. Winner will be notified by email and has 24 hours to claim prize. Prize will be fulfilled by Heroes of the City. I have received compensation for this post. All opinions are my own.

Summer Lovin

Welcome to the Summer Lovin’ Giveaway Hop, hosted by Viva Veltoro and Lindsey Blogs. This giveaway hop is full of bloggers who are ready to celebrate the warm temperatures of Summer with some fabulous prizes. Be sure to hop around to them all, including the TWO Grand Prizes – the first on Lindsey Blogs at SEBG and the second over at Viva Veltoro!

Summer Lovin Grand Prize

Click here to enter and view this list…

So Easy Being Green, Viva Veltoro, and the Summer Lovin’ participating bloggers are not responsible for sponsors who do not fulfill prize obligations.

DIY Office Redecorating


I started my job in October. At the time, I was one of three people in my office. By January, I was the only one still in this space. It felt a little lonely and like there was way too much furniture in the room. It took some brainstorming with a co-worker or two, but I finally decided that an office redecorating day was overdue.

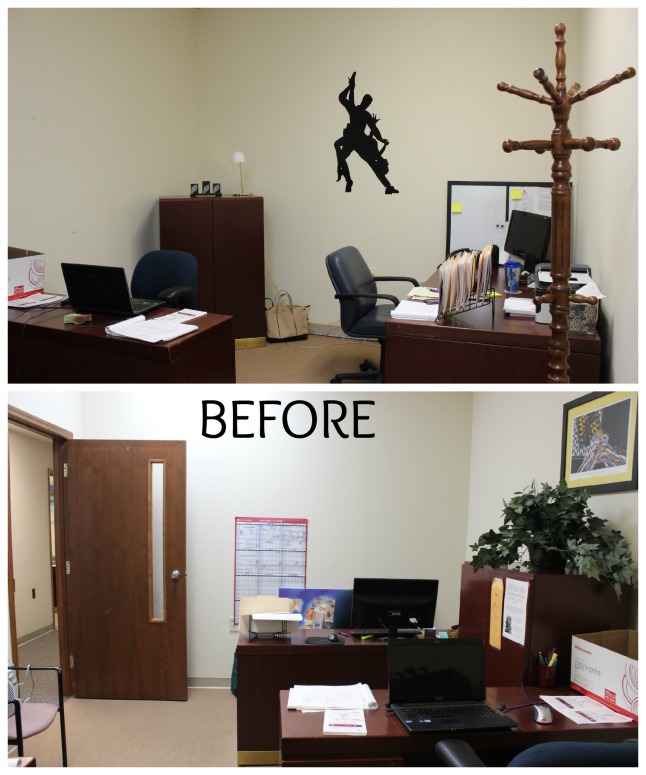
Here is how it looked before. By this point I had moved from the smaller desk in the middle of the room to the larger desk in the corner for more work space but I didn’t like that people were already in the middle of the room before I could see them. It was kind of plain since a lot of the décor left with one of my former office mates. Then there was the vinyl decal that was too stark with the black on white but couldn’t be removed without taking the paint with it.

Office Before Collage

Here are the ways I wanted my office to function:

  • I wanted some color.
  • I wanted to be able to have interns working in my space.
  • I wanted somewhere for people to sit when they came in.
  • I wanted a surface for projects, or meetings, or for my kids to sit at when they came into the office.

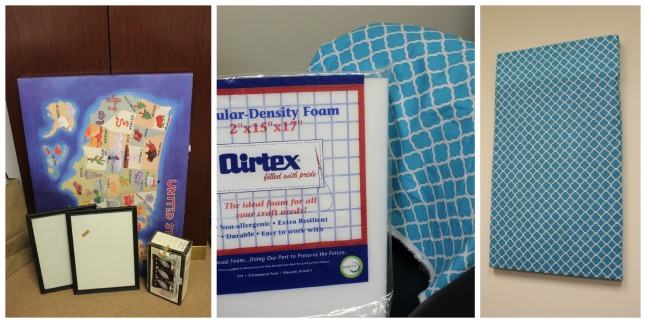
I also knew I did not want to spend a lot to refresh the space. After assessing what I wanted to keep that was already in the office, I started by digging through some household items in the garage that hadn’t made it into our current house. I found pillow covers along with extra pillow forms that were sitting in a closet, fabric I had previously used as guest room wall décor, and signed items in frames from my former life as a dancer and dance teacher. I also now had somewhere to put the 12×12 canvas print I won from Printicular.

I also dug through the company storage area and found some large items to put on the wall plus a small table that was just holding up a box and a couple of chairs. Lastly, it gave me an excuse to visit the Base Thrift Store to see if I could find a few things. I found a candle display, some plain black frames, and a large canvas print.

I picked up the large canvas print with the intent of covering it in fabric, but needed to make just a little bit larger so I picked up some foam when I purchased the fabric – with coupons, of course. I just neatly wrapped the foam and canvas and stapled in on to the wooden frame portion on the back.

Office supplies Collage

After enlisting the help of a few coworkers to move some of the furniture around and giving everything a good wipe down and vacuuming, here is the final product.

Office After Collage

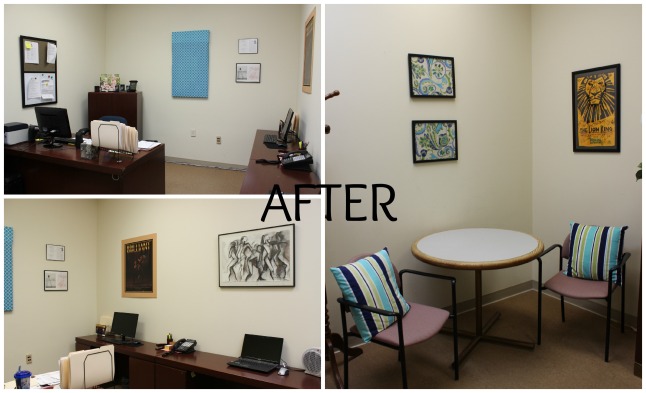
I don’t expect to win the designers reality TV contest, but it has been much more pleasant and functional. It’s kind of funny that no one used to really come into my office before but now people will walk in and sit at the little table and most people like the pops of blue in the room. I have also since added some flowers to the little table. Both the table and lining up the two smaller desks has been helpful when putting packets together or to plan out what needs to go to an event. My kids eat dinner here on the evenings that Kelsey has dance class plus they have a little bit of floor space to color or lay down. Even though there is more in the room, it actually feels bigger.

2015_02_09_8502

I was happy to finally have somewhere to display some of my dance memorabilia and it has been a topic of conversation when people come in, especially since you can see the Lion King poster from the hallway. When I was living in a first floor apartment, a hurricane came through and dumped a lot of water and flooded my apartment. I had items on the lowest shelf that were destroyed including some books and other items that had autographs on them. After drying them out, my Mom had the idea to cut up the covers and autographs to keep at least. I could have gotten these custom framed but instead, I got some frames and cardstock and cut out the size I needed for each book.

I think I hit every thing on my wish list and, best of all, I barely spent anything to do it thanks to a little reusing and repurposing. If I am going to be somewhere most of the day, I might as well make it my own.
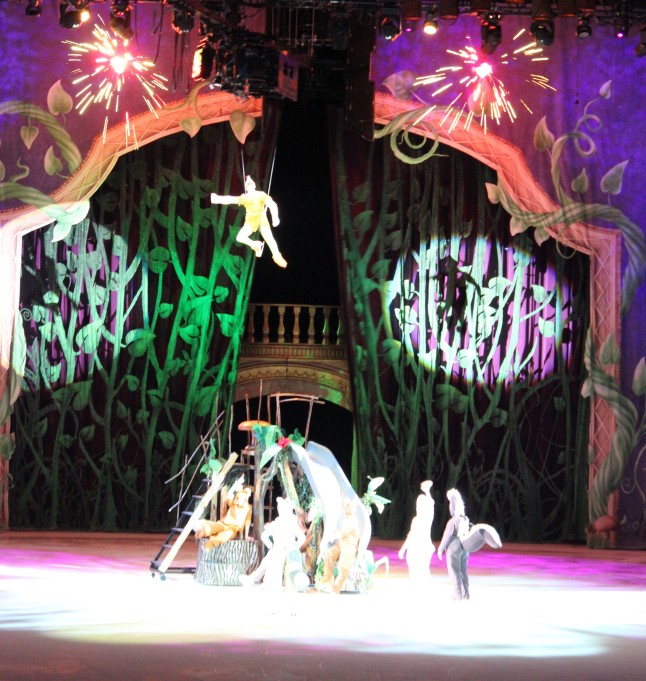
 

Shutterfly Free Stuff

Finger Paint Hearts Card

This year for Valentine’s for family I wanted to incorporate both girls. We do photo cards for Christmas so Valentine’s Day is a chance to let Kelsey be involved in the making and sending portions. I love that these finger paint hearts remind me of candy hearts!

2015_02_07_8426

I brought out some finger paints and brushes and plain white paper and had each girl paint with one color at a time.

After they all dried, I cut the paper into small squares and then into hearts. If you have a little bit older child, they could do this part themselves.

Then, I laid all the blank cards out on the table and let the preschooler glue the hearts onto the fronts of the cards where she wanted to go. The only supervising I had to do was trying to make sure the hearts were contained on the front of the card or it may not fit into the envelope later.

I printed off a message for the inside and let Kelsey sign her and her sisters name. After the glue dried, we put them in the envelopes and put them in the mail. Of course, I also tossed a picture of the girls in, too.

2015_02_08_8464editcrop

Happy Valentine’s Day!

Interchangable Headband for Hair Bows

I’m a genius! I found a way to put all the cute hair bows back into rotation. My one year old won’t keep a headband or bow on for 1 second. My three year old only likes regular headbands. If you ask her if she wants a “clippie” bow she’ll she yes but just wants to hold it, not wear it.

I thought about putting some on headbands since she loves the ones she has from Luna Blue’s but then I would end up with 100 headbands. I had a light bulb moment.

2014_09_23_6437

I couldn’t find just a single black fabric covered headband so I took a bow off an inexpensive store bought bow off of this one. Yes, there is still some glue stuck to it, but you don’t see it when there is a bow attached. I just hot glued on a little loop of ribbon. Make it just loose enough that you can get the bottom of an alligator clip in but it will stay in place.

2014_09_23_6440

That’s it! You can interchange any bow onto a headband. My daughter is thrilled because she can pick any bow. My little one is modeling below since the big one was taking a nap.

2014_09_23_6444

Enjoy! If you cloth diaper, be sure to check out the giveaway I am promoting.

”HappyandBlessedHome.com”

Quick and Easy Bows for Spring

Between wanting to take some 6 month photos, a trip to Disney, and Easter, I have been busy making a few bows. Here are some quick and easy bows to make to match any outfit and occasion.

Basic Bow with Bottlecap Center

IMG_0489

Thanks to I Like Big Freebies, Kelsey is going to end up with a whole bunch of bows with some of her favorite characters (you should check out their Facebook page to see the gorgeous bows people are making). She has almost every character you can think of and a bunch of popular themes available for you to print for free and use. I found 25 flattened bottlecaps and clear stickers on eBay for about $5.00 to use these with.

Finally, I found this tutorial for a quick bow when I was making bows for all the girls in my daughters’ preschool class. It’s so easy to do, I have just kept making them. You can pick up a spool of 1.5″ width ribbon fairly inexpensively with Michael’s or JoAnn’s coupons and sales. Or, if you are just making 1 bow in a particular, look for the “by the yard” section of ribbon if you don’t want to have extra ribbon around.

2014_03_13_5740


Ribbon Flower

IMG_0503

This is still one of the most popular posts on Domesticating Michelle. These ribbon flowers are pretty easy and quick to make and you can make them any color or color combination you can think of. They are also great for making multiple bows. You don’t have to use anything in the center but I think it gives it a finished look. A button, a rhinestone, a patch, or even a bottlecap can be used.

My instructions for covering an alligator clip are on this post, too.


Dr. Seuss Book Decor and Book Offer

We are Dr. Seuss fans here and have been working on a collection of Dr. Seuss titles over the past few years. I love that my daughter enjoys them being read to her and seemed to enjoy looking at them from the beginning. Using color copies and spray painting some old frames I had taking up space I made a little inexpensive wall art for the girls bathroom. These are the first letters of their first names.

seuss wall

Read Across America Day is March 1st and we are planning to go to at least one Dr. Seuss event in our area. The girls will be sporting their pillow case dresses, of course. Dr. Seuss’ birthday is March 2 so let the Seuss Mania begin!

Are you looking to build up your library? There is a great deal on Dr. Seuss books right now. Get 5 titles for only $5.95 for a limited time. Why should you take advantage of this deal?

1.No American writer has had as great an impact on children’s literature as Dr. Seuss.
2.His imaginative characters, vivid illustrations, and catchy rhymes are instantly recognizable to anyone who grew up reading his stories.
3.Great Deal for only $5.95! Includes: – The Cat in the Hat, Mr. Brown Can Moo, Ten Apples On Top, Go Dog Go! & The Tooth Book
4.PLUS: FREE Gift this week only…
5.And, of course: Free Shipping

Visit here to order yours today!

Crafting with Scraps

I bought a few used t-shirts to make this Easy T-shirt Door Wreath. I used most of the shirts in the wreath but had parts of the upper body and sleeves left over. I hate throwing things away so I decided to see what I could do with the left over pieces.

Kelsey had a t-shirt with a stain towards the bottom that I had been wanting to do something with so this Upcycled T-shirt Dress by I Am Momma Hear Me Roar was the perfect solution. Since Kelsey was in size 24 month and these were large and x-large adult t-shirts, I had enough material to cut out the pieces I needed to make this dress. For an added little touch, I cut out and ironed on a little heart on to the chest.

2013_02_04_1792

With a few of the left over strips I made a bracelet by braiding three strips together and hot gluing the ends together and then hot gluing a little piece around to cover the joint. I used a sleeve to make the headband and made a quick fabric bow with another scrap. I wrapped a little piece of scrap around to gather the headband and hot glued it then the bow on top of it.

Fabric Bow

This is becoming one of my favorite things to make with scraps. I’ve done these a couple different ways now but here is a no-sew version that makes a pretty bow and you can make it as big or small as you want or as much as you have scraps of. (If you are using jersey or t-shirt material, you don’t need to do worry about folding the edges since you don’t need to worry about shredding.)

  • fabric cut down to size you want
  • iron
  • thread
  • ribbon
  • alligator clip
  • hot glue gun

Start by folding over the edges and ironing them down. Fold lengthwise to the midpoint. Then, fold the ends to just past the midpoint to have a little bit of an overlap. Pick up in the middle and accordion it in between your thumb and first finger. Take a second to look at the front of the bow to make sure the fabric is in a good position. Wrap a piece of thread around the middle and double knot it to keep in all in place.

2014_01_03_5066

2014_01_03_5067

2014_01_03_5069

Hot glue a piece of ribbon around the middle. Hot glue ribbon to cover an alligator clip then glue to the bow.

2014_01_03_5072

Finally, put on the head of the cutest girl you can find nearby!

2014_01_18_5317

Easy Sewing Projects

With two little girls now, it is a little trickier to find matching outfits for holidays and special events without breaking the bank. Enter the sewing machine! My mother had been trying to get me to learn how to sew for years. Two years ago I finally made it my New Year’s resolution to sew a pillowcase dress by the end of the year. I made it in the nick of time and made her a Christmas dress. Since then, I’ve been doing little projects here and there. I decided to make Christmas dresses for the girls this past year and made some matching Valentine’s Day outfits, too. Here are some easy – as in, if I made it, then you can, too if you can turn on your machine and sew in a relatively straight line – tutorials I found around online. 2013_12_01-ChromAbbr-1055 T-Shirt Dresses I decided to make these dresses based on t-shirt dresses so I wouldn’t have to worry about creating the neckline or sleeves. The babies’ dress is based on this tutorial 10-Minute Onesie Dress by Pretty Prudent. However, since I had two coordinating fabrics I wanted to incorporate into each dress I used the ruffle from this T-Shirt Dress tutorial by Treasures for Tots. For the other dress, I want a tiered dress so I used the same Pretty Prudent tutorial for the top tier, putting it just below the armpit area. Then, I used the Treasures for Tots tutorial without a ruffle for the second tier. I was pretty proud of my first attempts at ruffles. I’d almost recommend using a one size too big for the onesie dress since sewing it eats up some of the length. In addition, I’d make the first tier shorter on the t-shirt dress so you can see the lower tier fabric better if I did this again. For the hair, I made two of my Ribbon Flower bows and wrapped a dollar store headband with ribbon to glue Kelsey’s on to instead of a clip. 2014_02_07_5467 Skirts and Dress I admit I was a bit intimidated to try a skirt for some reason. Let me tell you, this is the easiest thing in the world to make and the fabric choices are endless. I already decided to take a break for St. Paddy’d Day, but I’m already scouting fabric for the next set of skirts to make. It took less than a yard to make both of these and less than a yard of elastic so it was only a few bucks. I followed this Simple Skirt tutorial from You & Mie as directed for Kelsey’s skirt. It came out a touch too long, but at least it still covers her tush when she’s playing and she’s into “ballerina” skirts, as she calls them, so it will be a decent length on her for a while. I followed this Pretty Prudent Pillowcase Baby Dress only, I just folded the arm holes and top stitched instead of using bias tape. I just drew the shape to cut out on the wrong side of one of the pieces of fabric and pinned it, right sides facing, to the other layer to cut it out. I like that it was a more fitted, A-line style dress, but one if the benefits to a wider topped pillowcase dress is that it leaves plenty of room for growth. Both of these options make it pretty easy to layer or pair with any onesie or top you already have. For the hair, I made a headband and a fabric bow with the left over fabric. In general, it’s easy to combine ideas and patterns to get the look you’d like while not spending a lot of money. I think the Simple Skirt would be great for Halloween and dress up costumes, too. Have fun sewing! (In September I ended up making matching skirts with owl print fabric for Aubrey’s 1st birthday party!)

Easy T-shirt Door Wreath

Sometimes I get in the mood to decorate or make something seasonal but I don’t like spending a lot to do it. I came up with this easy, no sew wreath made with thrift store t-shirts.

2013_02_02_1778

What you’ll need:
– t-shirts to cut up
– scissors
– a wreath shape
– for optional poof: felt, glue gun/sticks, can or other round shape to trace

I figured 4 different colors would make a nice Valentine’s wreath but you’ll have to decide for yourself based on the colors you want it to be and the size of your wreath. 4 t-shirts left me with a little extra on my 18′ wreath so you may want to use more or less.

I picked t-shirts that were 50% off that day so I only spent about $2 for them all. You’ll want to pick shirts that are blank on at least one side of the shirt. You could also just purchase jersey fabric at your local fabric store if you didn’t feel like hunting the racks. I also found my wreath shape on a previous thrift store trip for a few bucks but you could pick one up at a craft store.

2013_02_01_1770

Start by cutting the t-shirts in half, separating front from back up to the armpits. Keep the sleeves in tact, however, if you’d like to try another craft with them. Then, cut them into strips. I cut mine about 3 inches wide but use your judgment based on preference and size of your wreath.

2013_02_02_1772

Once all your strips are cut and you’ve decided what order you want to put them in, start tying them on around your wreath shape and double knot them. Once you have covered the wreath, trim the tails so they are all about the same length for a neater look. Finally, trim off the neck from one of the shirts to loop on to the wreath to hang it.

2013_02_02_1773

You can stop here or if you’d like, you can add a few embellishments. I choose to make these little poofs with some of the extra material from the top of the t-shirt. Use a can or cup to trace then cut out 5-6 circles. Cut a little circle of felt to glue your t-shirt circles on to. Shape them into a V then glue down the first 4 in a circle then glue the final 1-2 into the center. Glue the whole thing in to the wreath.

2013_02_02_1776

Voila! A wreath for every season! I actually took apart the Valentine’s Day one I made and remade it with spring colors.

2014_02_10_5514

So, what to do with the extra t-shirt pieces? Stay tuned for my follow-up post.

Related posts:
Valentine’s Day 2012
Valentine’s Day Gift Ideas
Quick Valentine’s Day Cards